Script development
The test script is required to run any test on Loadero. This script is used to automate interactions with the UI by using Selenium and will be executed by every single participant in the test. All participants will be executing the same code, but will do so in an environment fully isolated from all other participants. When writing a Loadero script you only need to worry about automating participant actions and not about how participants will be launched and in what order.
The rate and order at which participants begin the test are decided based on participant grouping, start interval, and increment strategy.
Even though the same exact script will be executed for every participant in the test, it is still possible to have participants execute different actions within the same test. This can be achieved through the use of conditional statements and Loadero constants. Since only some of those participants will satisfy the conditionals, but others will not, different participants will end up going through different branches in the code.
Loadero currently supports three frameworks to write the test script in:
- JavaScript + Nightwatch.js
- Java + TestUI
- Python + Py-TestUI
Throughout this whole chapter of the Wiki you will see tabs for the three supported frameworks. You can switch between these tabs to see examples and additional information pertaining to a specific framework that you are interested in using.
You can read about available imports from the framework itself and third party packages/tools (and their versions) in the Framework information page.
All tests in Loadero, regardless of language, require that the test script is wrapped within one function. You can still define other functions but only for decomposition purposes - to call these functions from the main test function. In the case of Nightwatch.js and Py-TestUI these additional functions must be defined as nested functions within the main test function. For TestUI these functions must be defined after the main function, and then called from the main function.
Defining the script
- JavaScript + Nightwatch.js
- Java + TestUI
- Python + Py-TestUI
The test script of a project configured to use Nightwatch.js requires a script following the format given below.
client => {
  // Automation code in the form of a Nightwatch.js test function goes here
}
The client object represents the Nightwatch.js API. Though it is referred to
as client in Loadero documentation, this object can be named arbitrarily. The
Nightwatch.js API object is often referred to as browser in the
Nightwatch.js API reference.
This API provides all the built-in Nightwatch.js methods that allow interfacing with the web browser, such as navigating to URLs, identifying elements in the DOM, interacting with elements, executing JavaScript within the browser context, etc. All commands and assertions in Nightwatch.js are methods of this client. Along with the built-in Nighwatch.js methods, you may also use this API to use Loadero custom commands.
All script code, including variable/constant declarations must be within the
function body. If there is anything preceding the client or if something
follows the closing curly brace, then the test script is likely to fail due to
incorrect syntax.
The test script of a project configured to use TestUI requires a script following the format given below.
public void testUIWithLoadero() {
    // Automation code in the form of a TestUI test function goes here
}
All script code intended for execution must be within the body of the first defined function. Multiple functions may be defined, if they are intended to be called from within the first function. E.g., if two functions are defined and the first does not call the second, then upon running a test with this script only the first function will be executed but the second function will be ignored.
The first function must be a non-parameterized public void function. Other functions that are called from the first function may be parameterized, non-public and are allowed to return data.
The test script of a project configured to use Py-TestUI requires a script following the format given below.
def test(driver):
  # Automation code in the form of a Py-TestUI test function goes here
Providing the driver parameter is mandatory. It represents the instance of
TestUIDriver that will be used to manipulate the browser.
All script code must be within the test function. However, you may define additional, nested functions within the test function and call them from within the test function.
For examples of scripts that contain interactions with the browser, refer to our Example test scripts page. On top of what is already provided by the frameworks, Loadero also offers additional commands and constants that can be used within the test script. Read more about those on the Custom commands page and Loadero constants page, respectively.
Migrating an existing script to Loadero
We recommend developing a script locally first and only after confirming that it works to migrate the script to Loadero. This can help save money that might otherwise be spent on test runs that failed due to an incorrect script.
If you have an existing script already, some modifications will be required in order to have that script be runnable on Loadero. This section covers exactly what modifications are necessary in the form of a sequence of steps. If you find that the information provided in this section is not enough to get your script working on Loadero, reach out to us through the web chat available in the web application or by e-mailing us at support@loadero.com and we will help you out!
- JavaScript + Nightwatch.js
- Java + TestUI
- Python + Py-TestUI
Step #1. Copy the test script without the surrounding scaffolding. There are two primary ways how Nightwatch.js scripts tend to be defined - the "classic" syntax and the test case syntax, which in the context of Nightwatch.js is more recent. You can see examples of both styles below but the method of migrating the script to Loadero remains the same for both.
module.exports = {
  Bing: client => {
    client
      .url("https://www.bing.com")
      .waitForElementVisible("[type=search]", 10 * 1000)
      .saveScreenshot("bing.png");
  }
};
describe("Bing Search", function () {
  it("should take a screenshot", client => {
    client
      .url("https://www.bing.com")
      .waitForElementVisible("[type=search]", 10 * 1000)
      .saveScreenshot("bing.png");
  });
});
In either style the script might also be written as a traditional function
instead of an arrow function like in the examples, in which case instead of
client => you would have function (client) instead.
When migrating the script, just copy the part of the code that starts with
client => { or function (client) { until the function's closing brace,
resulting in the script shown below. Make sure that the closing brace is the
last character. It should not be followed by a semicolon.
client => {
  client
    .url("https://www.bing.com")
    .waitForElementVisible("[type=search]", 10 * 1000)
    .saveScreenshot("bing.png");
}
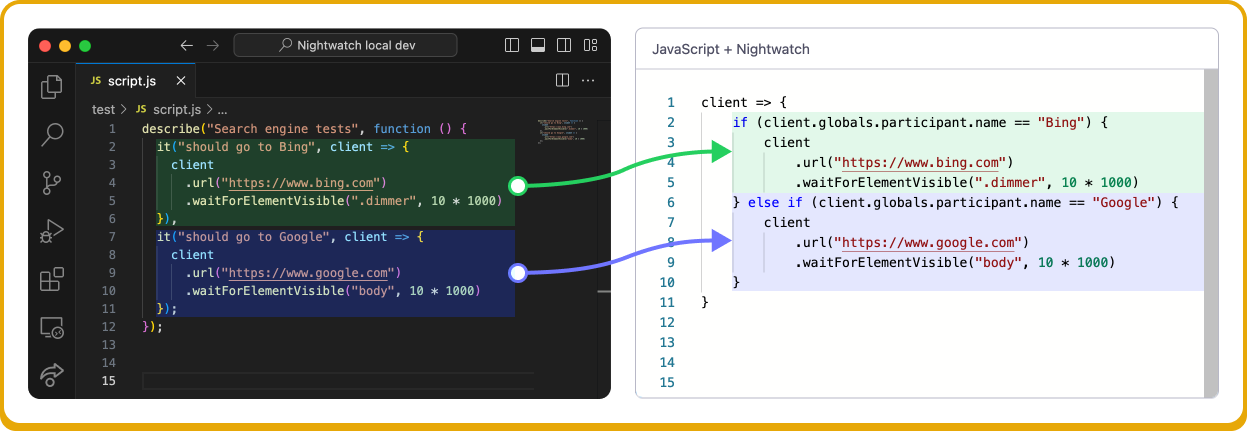
Nightwatch.js allows to define multiple test scripts within one file and the cases can be run separately from one another. This is not the case on Loadero, where only one test script must be defined. If locally you have defined multiple test scripts in one file and want to migrate all of them to Loadero, you will need to do one of these two:
- Migrate each test script into its own Loadero test.
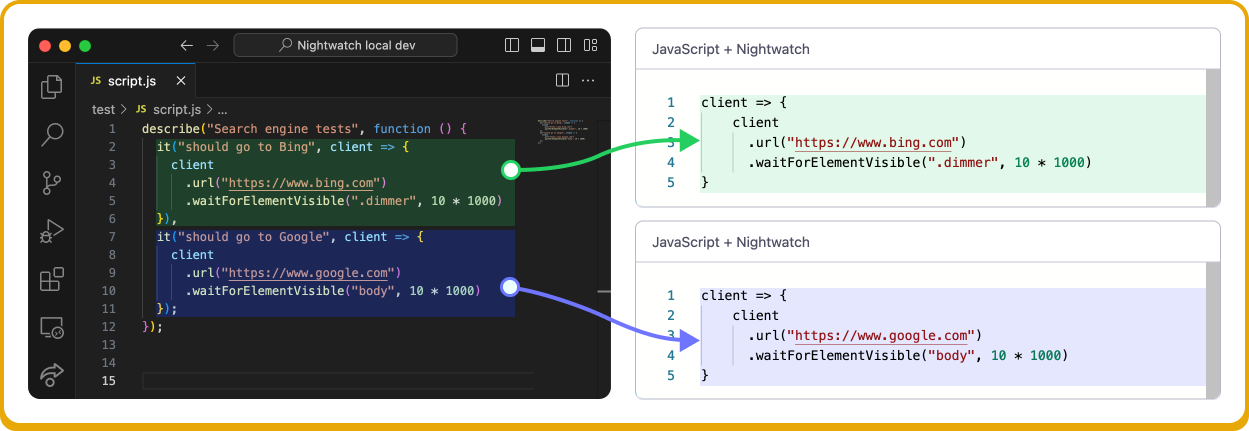
- Use if-else conditionals to instruct different test participants to execute a
different test script despite residing within the same Loadero test - more
details on how this works are provided in the
Loadero constants page.
Step #2. Review used imports. Your script may have been relying on modules that were imported from outside the test script function. When using Nightwatch.js in Loadero you are only able to use JavaScript libraries and modules that are listed in our Framework information page. These dependencies are handled in the background and are imported before test execution and can be referenced directly within the test script without any import/require commands.
If your script is relying on local imports (e.g., a function is defined in another file), then you should rewrite that function's declaration within the test script function body and remove the import.
If a third party import is necessary for your script to work but is not pre-imported by Loadero, then you may be able to copy the definitions of the functions you need from that library and paste them into your own script to use. However, if this is not possible, you are encouraged to reach out to us and our team will see what can be done about the situation.
Step #1. Copy the test function definition without the surrounding
scaffolding. When migrating a test from local TestUI development to Loadero,
you should copy the test function definition and paste that directly into
Loadero. Note that you should migrate only the test function definition.
Your migration should not include the @Test annotation or the class body
within which the test function resides. Import statements should also be
excluded. Refer to the examples below of how code may look locally and how it
should look on Loadero.
package QA;

import static testUI.UIOpen.open;
import static testUI.Utils.By.*;
import static testUI.elements.TestUI.E;

import org.junit.Test;

public class AppTest {

    @Test
    public void testBing() {
        open("https://bing.com/");
        E(byCssSelector("[type=search]"))
            .waitFor(10)
            .untilIsVisible()
            .saveScreenshot("bing.png");
    }
}
public void testBing() {
    open("https://bing.com/");
    E(byCssSelector("[type=search]"))
        .waitFor(10)
        .untilIsVisible()
        .saveScreenshot("bing.png");
}
Your .java file in the local environment may have multiple defined test
functions, whereas within the Loadero script only the first function will
be executed, unless the following functions are called from within the first
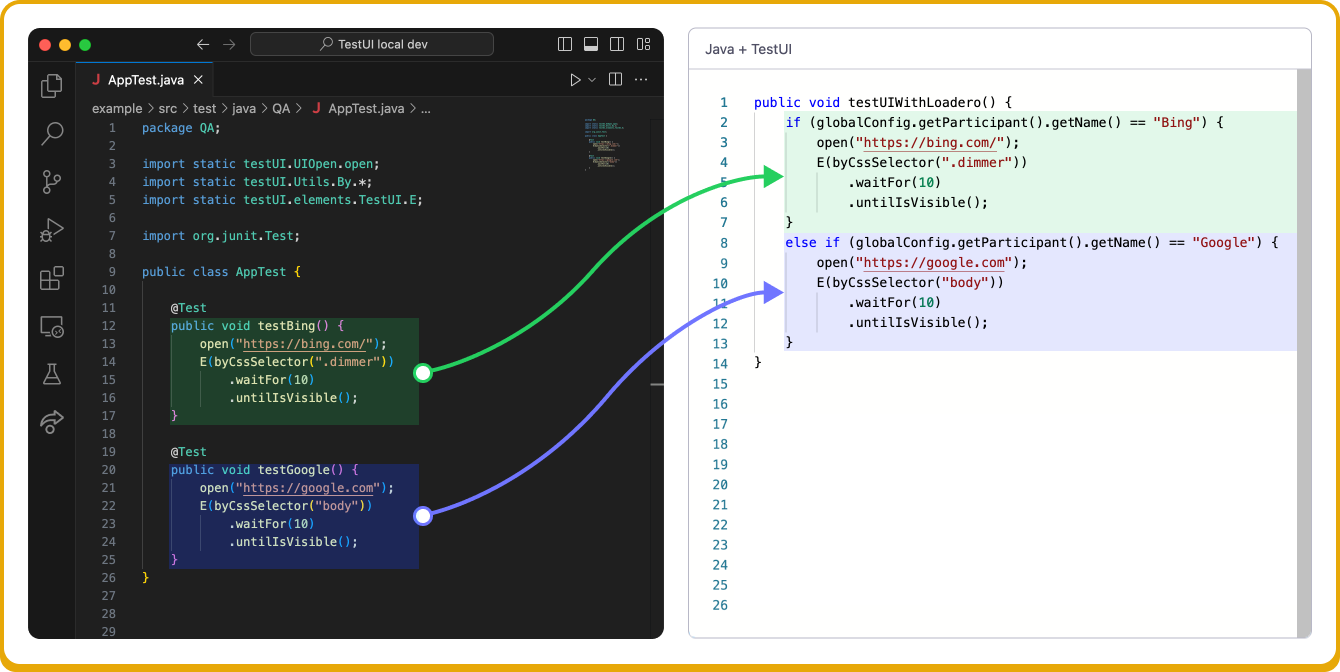
function. If you want to migrate all of these test functions and not just one
of them, then you will need to do one of these two:
- Migrate each test function into its own Loadero test.
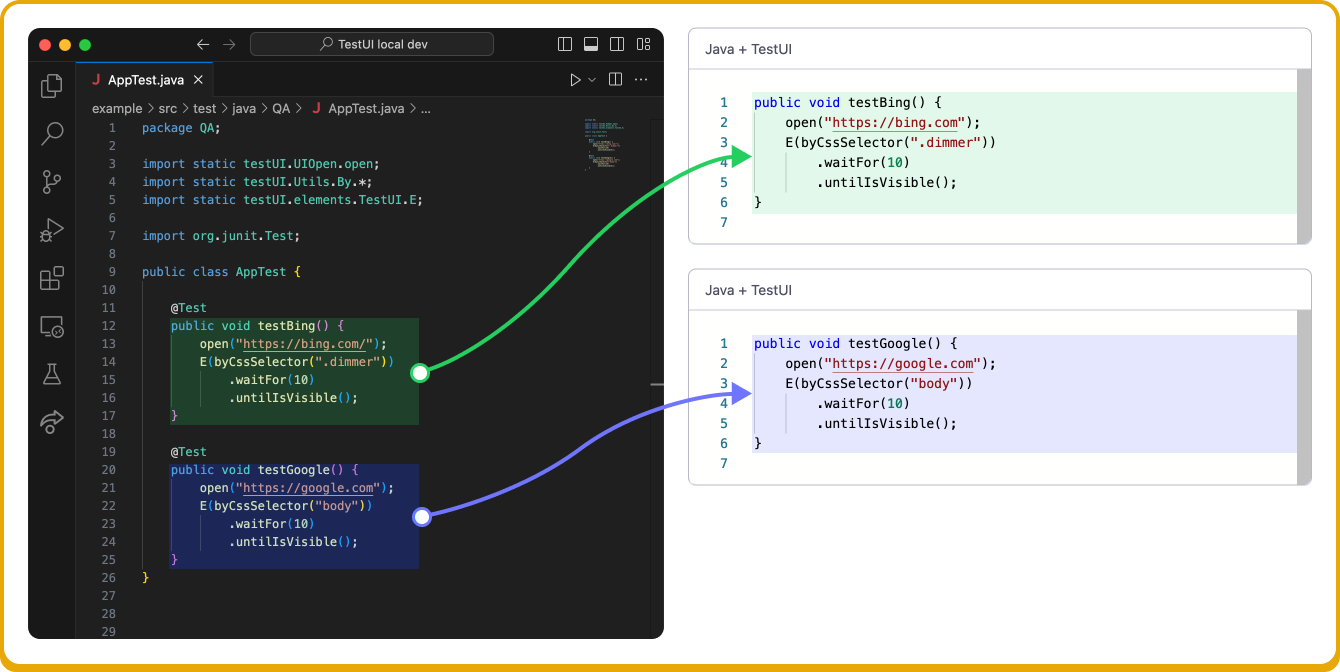
- Use if-else conditionals to instruct different test participants to execute a different test script despite residing within the same Loadero test - more details on how this works are provided in the Loadero constants page.
Step #2. Review used imports. When using TestUI in Loadero you are only able to use the libraries and modules that are listed in our Framework information page. These dependencies are handled in the background and are imported before test execution and can be referenced directly within the test script without any import commands.
If your script was relying on local imports (e.g., a function defined in another file), then you should rewrite that function's declaration within the Loadero test script and then call it from the inside of the main function.
If a third party import is necessary for your script to work but it is not pre-imported by Loadero, then you may be able to copy the definitions of the functions you need from the corresponding module and paste them into your own script to use. However, if this is not possible, you are encouraged to reach out to us and our team will see what can be done about the situation.
Step #1. Copy the test function definition without the surrounding
scaffolding. When migrating a test from local Py-TestUI development to
Loadero, you should copy the test function definition and paste that directly
into Loadero. Note that you should migrate only the test function
definition. Your migration should not include initialization of the
TestUIDriver object, nor the call to the test function. Import statements
should also be excluded. Refer to the examples below of how code may look
locally and how it should look on Loadero.
from testui.support.appium_driver import NewDriver
from testui.support.testui_driver import TestUIDriver
from testui.elements.testui_element import e

driver: TestUIDriver = (
  NewDriver()
  .set_logger("pytest")
  .set_soft_assert(True)
  .set_selenium_driver()
)

def test(driver: TestUIDriver):
  driver.navigate_to("https://bing.com/")

  e(driver, "css", "[type=search]").wait_until_visible(10)

test(driver)
def test(driver: TestUIDriver):
  driver.navigate_to("https://bing.com/")

  e(driver, "css", "[type=search]").wait_until_visible(10)
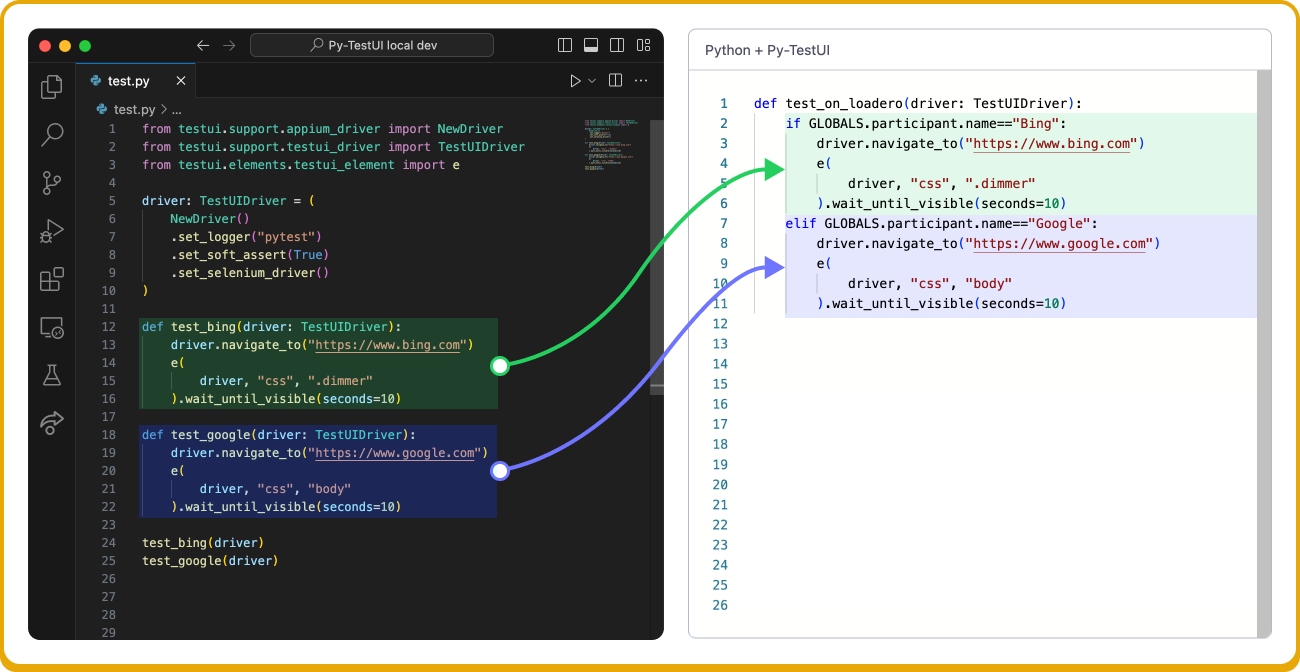
Your .py file in the local environment may have multiple defined test
functions, whereas within the Loadero script there must be just one test
function (though that function is allowed to still have nested functions). If
you want to migrate all of these test functions and not just one of them, then
you will need to do one of these two:
- Migrate each test function into its own Loadero test.
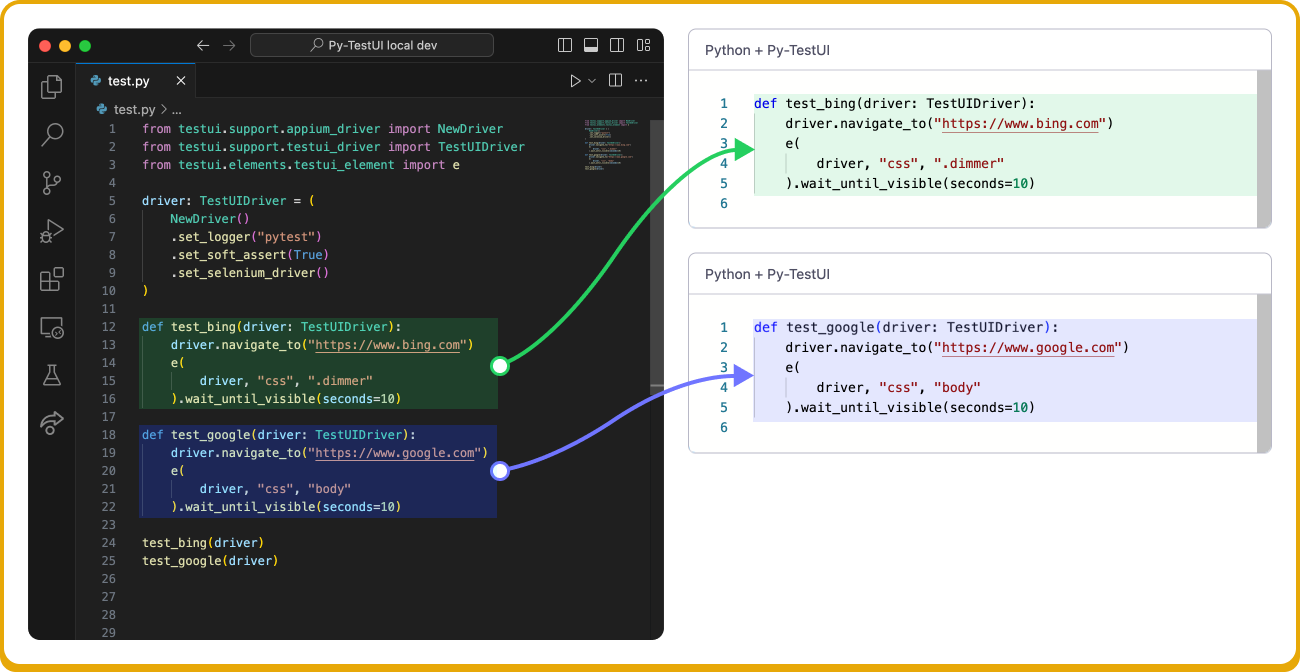
- Use if-else conditionals to instruct different test participants to execute a different test script despite residing within the same Loadero test - more details on how this works are provided in the Loadero constants page.
Step #2. Review used imports. When using Py-TestUI in Loadero you are only able to use the libraries and modules that are listed in our Framework information page. These dependencies are handled in the background and are imported before test execution and can be referenced directly within the test script without any import commands.
If your script was relying on local imports (e.g., a function defined in another file), then you should rewrite that function's declaration as a nested function within the Loadero script's test function and then call it from there.
If a third party import is necessary for your script to work but it is not pre-imported by Loadero, then you may be able to copy the definitions of the functions you need from the corresponding module and paste them into your own script to use. However, if this is not possible, you are encouraged to reach out to us and our team will see what can be done about the situation.
Script execution time and participant timeout
When you're creating a test, one of the test parameters is the participant timeout. The participant timeout parameter determines the maximum permitted running time of a participant. This means that if for any reason the participant has been executing the test for longer than the allotted participant timeout value, then that participant will be terminated. The participant timeout is used to resolve situations where a participant may unexpectedly be frozen or stuck in execution longer than planned.
Participants that stopped executing the script due to timing out will be characterized in the run report by a "timeout" status.
A common misconception is that the script will be looped until the participant timeout is reached - this is not true. The script will be executed once and any looping needs to be implemented directly in the script by the user.
Make sure that the participant timeout is set to a value higher than how long the script is expected to execute.
The timer for each participant is separate because participants will start execution at different moments (see: start interval and increment strategy parameters), and this timer will only begin counting down once the participant actually begins executing the script. If one participant times out, the remaining participants will not be affected unless their individual timers also exceed the participant timeout value.